Tuesday, October 26, 2010

Strawberry Cheesecake Cupcakes

Over the summer I was out of the office on medical leave for about 13 weeks and I’m pretty sure that I spent most of my days watching cooking shows and gaining 10lbs with each show. I wanted so badly to be able to be on my feet in the kitchen and baking up a million different delicious treats. By the time I went back to work at the end of July I had a dozen or so recipes to try on my coworkers. I’ve spent the last several weeks trying different ones out and I’ve discovered I really love making cupcakes.

Yesterday on Mama’s Kitchen’s Facebook fan page I asked the fans what sort of cupcake they would enjoy. Among the entries, my cousin Rachael requested a strawberry cupcake with a cheesecake filling and I immediately set to work building it out in my head. I’ve seen various concoctions of strawberry with a cream cheese frosting but I wanted to go beyond that.

Inspiration for this recipe came from Annie’s pumpkin cream cheese muffins. I really liked the way she did the cream cheese center, and I was hopeful that this concept could carry over. What I came up with was a strawberry cupcake base, with a cheesecake disc in the center, topped with a strawberry cream cheese frosting. There is just the right balance of sweetness – because there is nothing worse than your teeth aching when you bite into something sweet.

Thanks Rach for the suggestion – I have truly enjoyed creating this one!

Strawberry Cheesecake Cupcakes
Yield: 30 cupcakes

For the Filling:
12oz cream cheese
½ cup granulated sugar
½ tsp. vanilla extract
1 egg
½ cup graham cracker crumbs

For the Cake:
2 ½ cups all-purpose flour
½ tsp. salt
1 tsp. baking powder
1 stick unsalted butter, room temperature
 1 ¾ cup granulated sugar
1/3 cup sour cream
2/3 cup milk
2 eggs, room temperature
1 tsp. vanilla
1 cup fresh strawberry puree (about 10 strawberries)

For the Frosting:
8oz cream cheese, softened
1 stick butter, softened
2 cups powdered sugar, sifted
5 strawberries, pureed

Directions:
For the filling, cream everything except the graham cracker crumbs in your stand mixer until smooth, approximately five minutes. Lay a piece of saran about 24” in length wrap long ways on the work surface and spray lightly with cooking spray. Sprinkle you graham cracker crumbs evenly over the saran wrap and drop your cream cheese mixture in the beginning shape of a log over them. Using the saran wrap to help, gently roll your cream cheese mixture into a log about one inch in diameter and about 18” in length. Wrap in foil and freeze until firm, about two hours.

Preheat your oven to 350°F. Line three cupcake pans with liners and set to the side. (Alternately, if you’re like me and only have two pans, you can bake in two sessions.)

For the cake, cream together your butter and sugar until light and fluffy, about 5 minutes. Add in your eggs one at a time, beating thoroughly after each one, and then add in your vanilla. Slowly add your dry ingredients, alternating with your wet ingredients and always ending with flour. This will ensure you have a smooth batter. Stir in your strawberry puree.

Using an ice cream scoop, fill your cupcake bays half full. Remove your cheesecake log from the freezer and slice into 30 equal pieces, and place a piece of the cheesecake directly on top of your cupcake batter. Top cheesecake with enough batter to make bays ¾ full.

Bake in your preheated oven for 20-22 minutes, rotating pans half way through the baking time, until a toothpick inserted in the center comes out clean. Remove from oven, and cool for five minutes in the pan. Transfer to a cooling rack and cool completely before frosting.

To make the frosting, cream together your cream cheese and butter until smooth. Stir in your strawberry puree until incorporated. Slowly add in your powdered sugar until combined, and then whip for five minutes until light and fluffy. Frost to your liking, and sprinkle with extra graham cracker crumbs.

Enjoy! KC

Monday, October 25, 2010

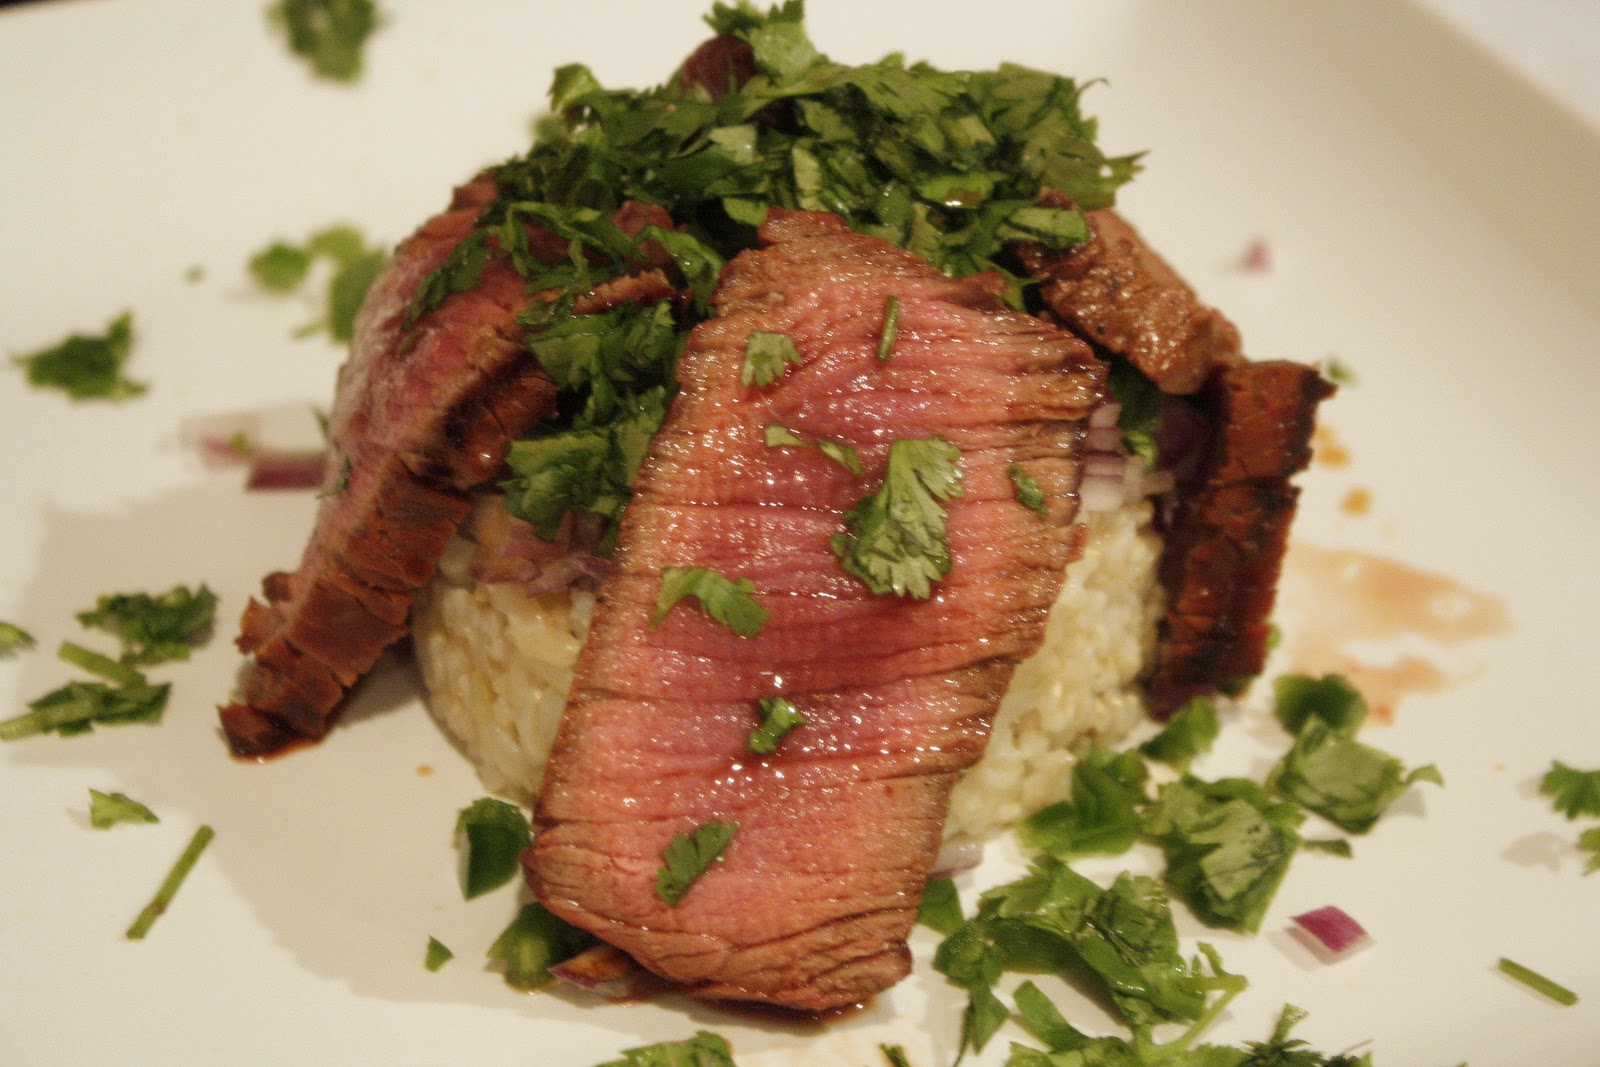
Bison Tenderloin Tower

Brent and I rarely have “date nights”. Sure, we go out to eat almost every week but never really a date. Finally this past weekend we decided to do just that and went to have dinner at our favorite little sushi restaurant up the street from our house. One of our favorite rolls there is called the CowTown Roll – waygu beef, spring mix, cilantro, red onion, jalapeno and ponzu sauce. As soon as we’d eaten it, I knew I had to try it at home.

My intention was never to make a hand roll. All along I knew I wanted to take a tower approach instead, and I think it turned out quite well. We couldn’t find a good piece of waygu beef we liked at Central Market so we chose to use a bison tenderloin instead – and boy am I glad we did! Rich, buttery, melt-in-your-mouth, mmmmmmmm! Brent actually let me grill this and believe me, if I can do it, anyone can.

Bison Tenderloin Tower
Yield: 2 servings

Ingredients:
1lb bison tenderloin
½ cup soy sauce
1 tsp. Dijon mustard
1 tsp. sherry vinegar
¼ cup minced garlic
2 cups cooked brown rice
1 cup minced red onion
1 jalapeno, ribs and seeds removed, minced
1 cup fresh chopped cilantro
Ponzu sauce, for drizzling

Directions:
In a small bowl, combine your soy sauce, mustard, vinegar and garlic and mix well. Put your tenderloin in a baggie and pour marinade over the top. Seal the air out and let rest in the fridge for one hour, then take out of the fridge and let come to room temperature while you heat up your grill.

Bring your grill to 650°F. Sear your bison tenderloin for two minutes per side, flipping twice, for a total of six minutes. On your last flip, shut your grill down completely and let rest in the hot grill for five minutes, then remove from the heat and let rest for five more minutes. Slice thinly.

To assemble your tower, use any wide cylindrical object – I used an old plastic cup and cut the narrow end off. Place one cup of cooked rice in the bottom of your tower, followed by half of your red onion and half of your jalapeno. Gently remove your shaper and lay half of your grilled bison around the tower. Sprinkle with chopped cilantro and drizzle with ponzu.

Enjoy! KC

Sunday, October 24, 2010

Smoked Turkey Breast

If you think you can only have turkey at Thanksgiving, you are missing out. (Turkey lunchmeat not included LOL) Seeing as how my husband runs a barbeque store we tend to grill a lot. Thankfully it’s the one place he can cook really well without the possibility of burning down my house.

Brent can make a killer brisket, pulled pork, you name it – and I’m sure all of his recipes will end up here. This is his as well. Very, very simple and oh-so-flavorful. Brining the meat is important as it imparts flavor and juices before the cooking process begins. The rub featured here is from the Big Green Egg cookbook but you can use any rub you please.

Now, I realize there are a million different kinds of smokers. We happen to own a Big Green Egg ourselves so it is slightly different than most – but by far one of the best grills you can buy. Brent suggests tailoring the smoking to what works best for your equipment, and if you don’t know, leave a comment and he’ll be happy to help.

Smoked Turkey Breast

3-4lb bone-in turkey breast
3-4 Hickory wood chunks

For the Rub:
2 T. freshly ground tri-color peppercorns
2 T. sweet paprika
2 T. garlic powder
2 T. onion powder
2 T. Kosher salt
2 T. dried oregano
1 T. chili powder
1 T. celery seed
2 T. light brown sugar

For the Brine:
½ cup Kosher salt
½ cup granulated sugar
2 quarts water

Directions:
Mix all of your rub ingredients in a small bowl until combined; set aside.

To brine the turkey breast, stir together your ingredients until salt and sugar are dissolved. Place the turkey breast in a gallon baggie, pour in the brine, seal all of the air pockets out and let rest at room temperature for one hour.

In the meantime, preheat your smoker to 200°F. Once the smoker is to temperature, put your wood chunks directly in the center of your charcoal. Place your seasoned meat in a roasting rack fitted into a drip pan and then into the smoker. Smoke for approximately one hour per pound of meat, until internal temperature reaches 165°F.

Let rest for twenty minutes before slicing.

Enjoy! KC

Thursday, October 21, 2010

Protein

There is nothing whatsoever fancy about this meal. As a matter of fact it is not really worth a post, except to show you how I eat when I'm not dreaming up gourmet, calorie-laden foods. Usually I don't get home from the office until around 4:30pm when LB isn't here, and in order to eat by 5:00pm so that I am ready to work out at 7:45pm I have to cook FAST. Quick, simple, protein-packed and D-E-L-I-C-I-O-U-S.

This is a perfect example. Eggs, bacon, cottage cheese (and a side of quinoa added later) come together in under five minutes and are really satisfying. I tend to cook my bacon in the microwave when I'm short on time, and in the few minutes that is cooking I can scramble up some eggs. Cottage cheese is a new thing for me and I'm learning to like it in small doses, preferably with salt & pepper. I've seen it served all sorts of ways but simple works best for me.

Another great option is chicken breasts. Place a frozen chicken breast in a saute pan with some Mojave Garlic Pepper, cover and let it steam while you cook up some green veggies (or my favorite spinach and egg combo). Quinoa is always a great addition as it is a perfect protein and a seed as opposed to a grain.

Eating so "lightly" can be difficult. My natural inclination is to spend a couple of hours making dinner and really enjoying it. When LB returns Sunday we'll start back to that, but I'll try to keep all recipes under an hour. :-)

Enjoy! KC

Tuesday, October 19, 2010

Simple Scallops

Growing up I was never a fan of seafood, but the older I've gotten the more I've come to like some things. Nights like tonight my husband doesn't get home until 7:30pm and we leave straight for the gym so I like to eat a quick protein-packed dinner before 5pm. This meal is perfect, easy to prepare and just the right amount of flavor.

For this variation I've paired my scallops with a mixture of cooked orzo with spinach and cream. Total time to complete this meal was 15 minutes.

Scallops
Yield: 2 servings

Ingredients:
1lb bay scallops, rinsed and dried
1/4 cup bacon fat
1/4 cup herb butter
1/2 tsp. Kosher salt
1/2 tsp. fresh cracked black pepper

Directions:
Melt together your butter and bacon fat in a 10" skillet over medium-high heat. Gently drop in your scallops and sprinkle with salt and pepper. Cook for 2 minutes, stirring frequently to "baste" the fish with the liquid.

After 2 minutes, remove from heat, cover and let sit for five minutes. Serve immediately.

*For the orzo side, I simply cooked orzo until al dente and added in some fresh spinach during the last 3 minutes of cook time. Strain completely and return to pan. Add in 1/4 cup heavy cream, salt and pepper and stir. Yum!

Enjoy! KC

Thursday, October 14, 2010

My Favorite Potato Soup


Whenever I was sick as a kid, my Mama would always fix me homemade potato soup. It seemed like she would slave over the stove forever for that creamy goodness. Turns out it was nothing more than potatoes and milk but it was still one of my favorites.

A few years ago just as Fall was making its appearance I threw together this soup out of basically nothing. It was late, chilly, and I was sick and did NOT feel like going to the store. Using a few staples I had around this soup was born and has quickly become my favorite grown-up potato soup. It's slightly sweet with just a hint of spice - but if you're like me, you'll add a little extra.

Potato Soup
Yield: 6 servings

Ingredients:
2 large baker potatoes, peeled and large diced
2 Granny Smith apples, peeled, cored and large diced
1/2 lb. honey or brown sugar ham, diced
1 medium sweet yellow onion, diced
2 cloves garlic, minced
4 cups chicken broth
2 cups water
1 1/2 tsp. Kosher salt (or Real Salt)
1/2 tsp. black pepper
Generous pinch of cayenne pepper
Generous pinch of ground cinnamon

Directions:
Heat a large stock pot over medium-high heat and drizzle well with extra-virgin olive oil. Once hot, toss in your diced onions and ham and cook for 4-5 minutes, stirring occasionally, until the onions begin to sweat.

Add in your diced apples, garlic and dry spices and cook for an additional 3 minutes, stirring frequently. Add in your potatoes, broth and water and stir. (The liquid should be above the potatoes; if not, add just enough extra water or broth to cover.)

Reduce heat to medium and simmer soup for 25 minutes, or until potatoes are tender. Allow to cool for 5 minutes and then use an immersion blender to puree about half of the soup (you can also use a food processor.) Serve with a drizzle of heavy cream.

Enjoy! KC

Pumpkin Sandwich

 Okay, I'll admit: this sandwich alone is not really worth an entire post. However, the bread itself is - and with the addition of a couple of ingredients becomes one of my favorite Fall snacks.

This past weekend I made some homemade pumpkin puree and let me tell you - I will never buy canned again. Most of it was frozen but I had about a cup left over and was really craving some pumpkin bread. Once the bread was baked and cooled, I cut two thin slices and slathered whipped cream cheese on one then topped it with honey roasted turkey. This, my friends, is phenomenal. It's a perfect little bite when you just need something to hold you over for a bit. Sweet, savory and delicious!

Now for the bread, this is my favorite pumpkin bread recipe yet and even my husband loved it. It's very simple to put together and the taste can't be beat. It'll definitely be making appearances at holiday functions this year.

Pumpkin Bread
Yield: 1 loaf

Ingredients:
1/2 c. sugar
1/2 c. vegetable oil
2 eggs, lightly beaten
1 c. fresh pumpkin puree
1 c. all-purpose flour
3/4 c. whole wheat flour
1 tsp. Kosher salt
1 tsp. baking soda
1/2 tsp. baking powder
1/2 tsp. ground nutmeg
1/2 tsp. ground allspice
1/2 tsp. ground cinnamon
1/3 c. water

Directions:
Preheat your oven to 350°F. Grease and flour a 9"x5" loaf pan. Combine your dry ingredients in a medium bowl and set aside.

In the bowl of a stand mixer, combine your sugar and oil and mix on medium speed until sugar begins to dissolve. Add in your eggs and pumpkin and stir until incorporated, scraping the sides of the bowl as necessary.

Blend in your dry ingredients, alternating with the water, just until moist. Pour into your prepared loaf pan and bake for 1 hour to 1 hour 15 minutes, or until a toothpick inserted in the center comes out clean. Remove from the oven and cool on a rack for 10 minutes, then remove from pan and cool completely.

Enjoy! KC

*Recipe adapted from The Food Network.

Related Posts Plugin for WordPress, Blogger...